
RPA 101: How to build a customized workflow in VMOSCloud
1. What is VMOSCloud automation
VMOSCloud supports AI agent automation, uses AI-powered templates for automation, and Open API automation. Now we update an intuitive way to automate cloud phones: RPA automation features.
2. Who can use RPA
The VMOSCloud RPA is a no-code solution to use 'workflow bot' to execute repetitive, rule-based tasks in cloud phone devices automatically, including tasks to mimic human actions—such as typing, clicking, scrolling, searching, comments and more. It is perfect for less tech-savvy users, teams, agencies and organizations to customize more complex workflows, streamline manual work and reduce costs here.
3. Select the best way for your needs
Before getting started, choose the best way that fits your specific needs.
(1) If your task in mobile apps is simple and usually happens in social media apps, please consider using the preset templates in Automation-> Template Store.
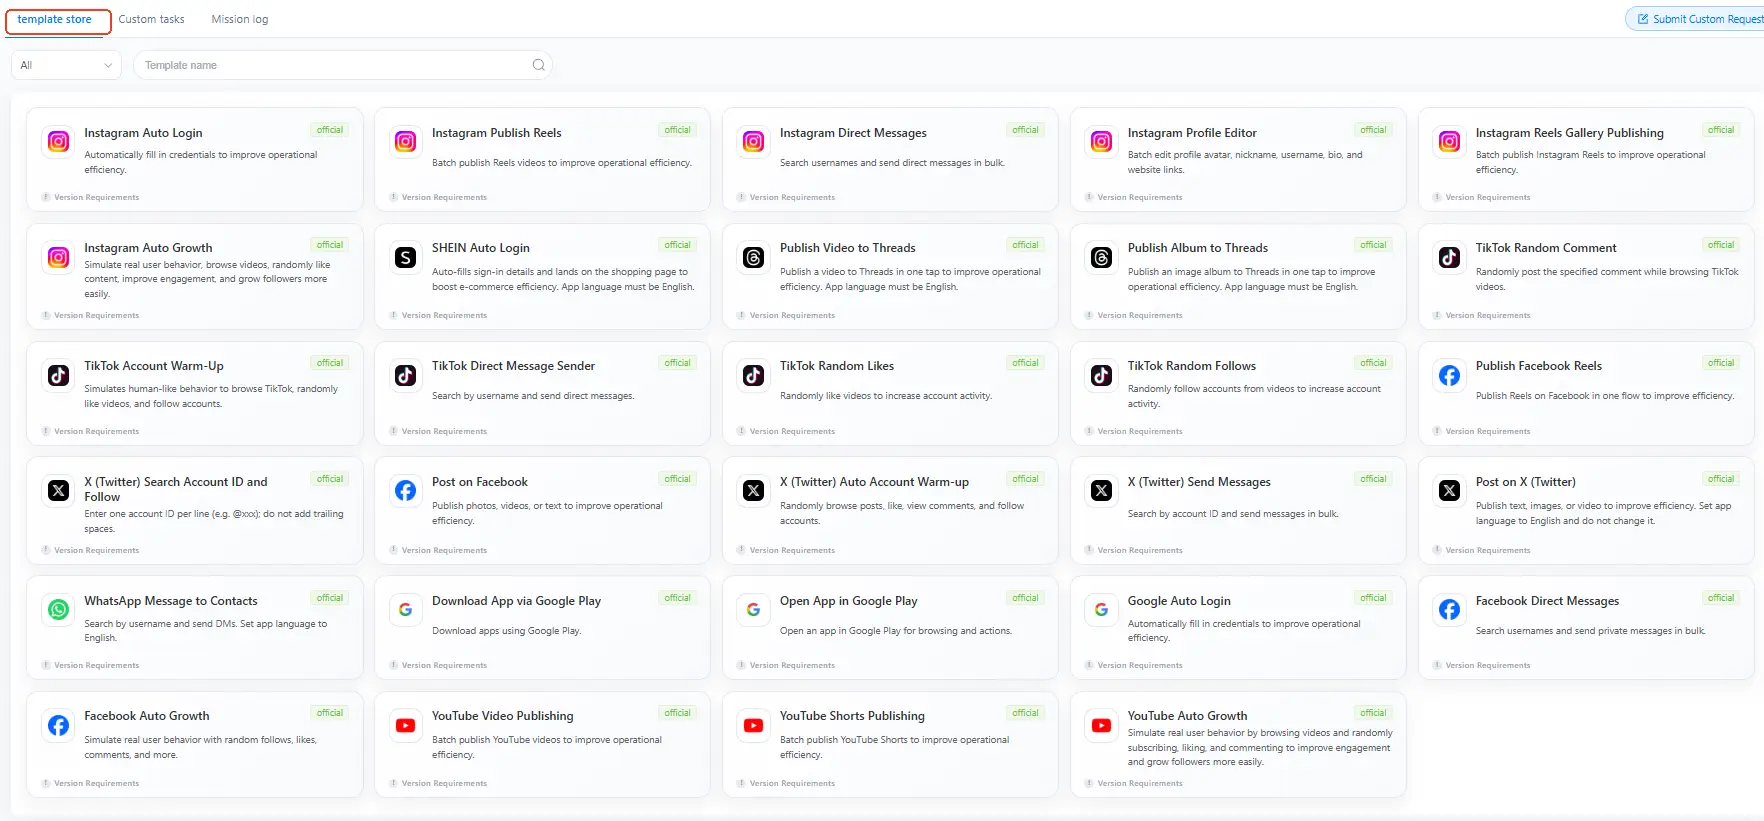
(2) If you want to make sure every task steps in a precise way, or customize a specific automated workflow for your business, please scroll down to learn how to build the RPA workflow in VMOSCloud.
4. Before start: everything you need to know about RPA building
(a) Where to build RPA: Go Atomation-> Custom tasks-> Blank process.
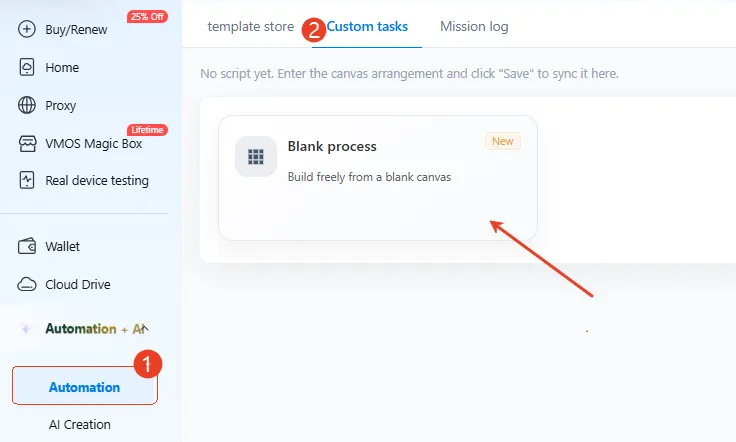
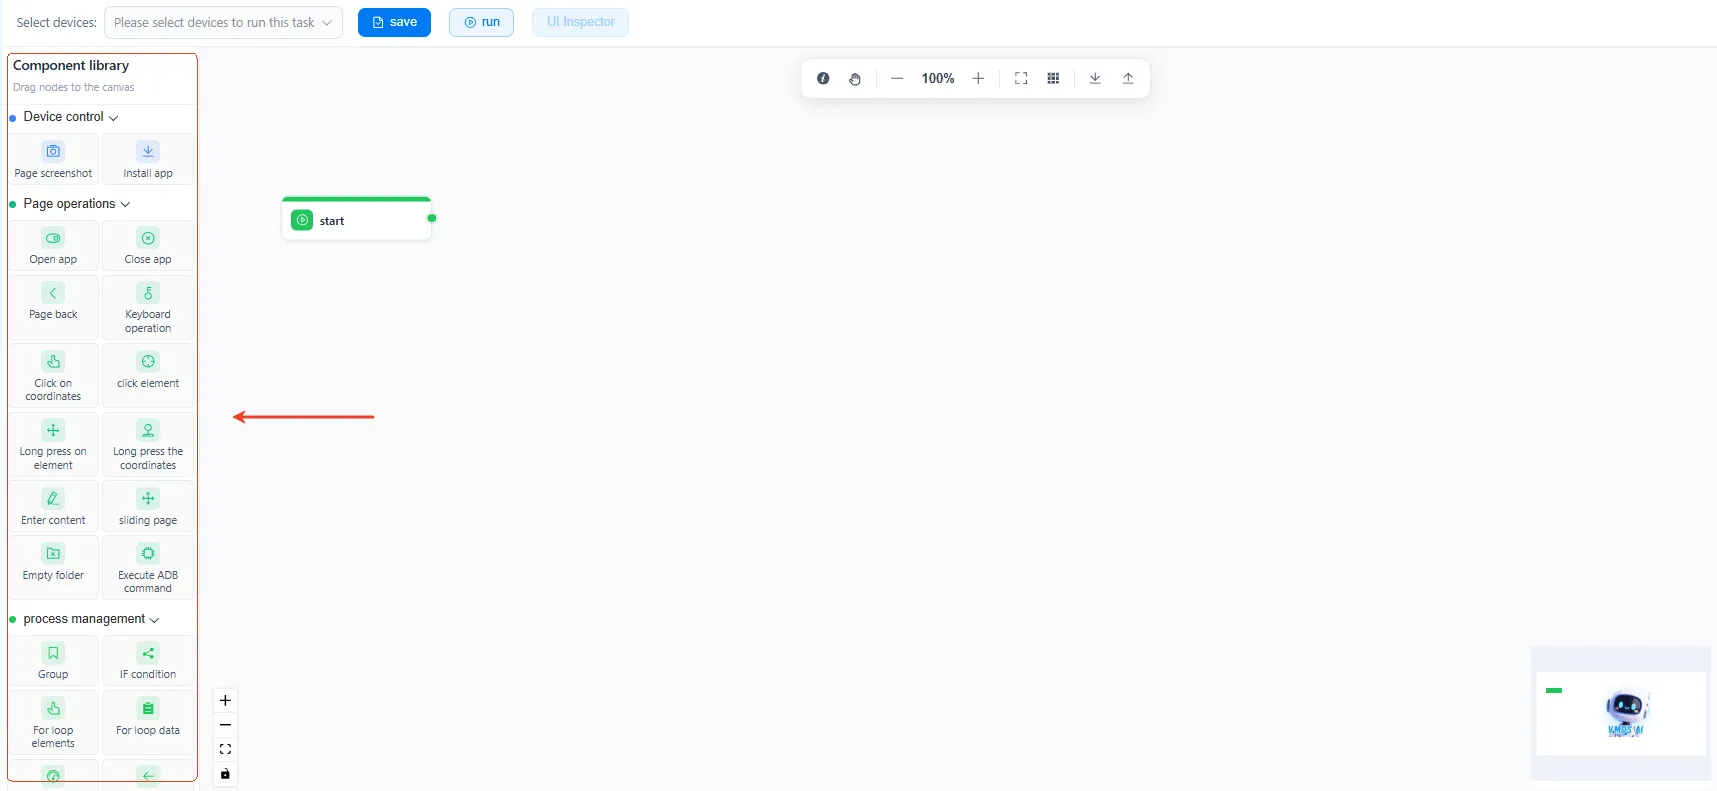
(b) Below is the RPA workspace for building task templates. We'll start with a brief introduction to get you up and running.
The left side bar is the RPA template editing area, where you can drag and drop to set up different actions in the cloud phone for automation.
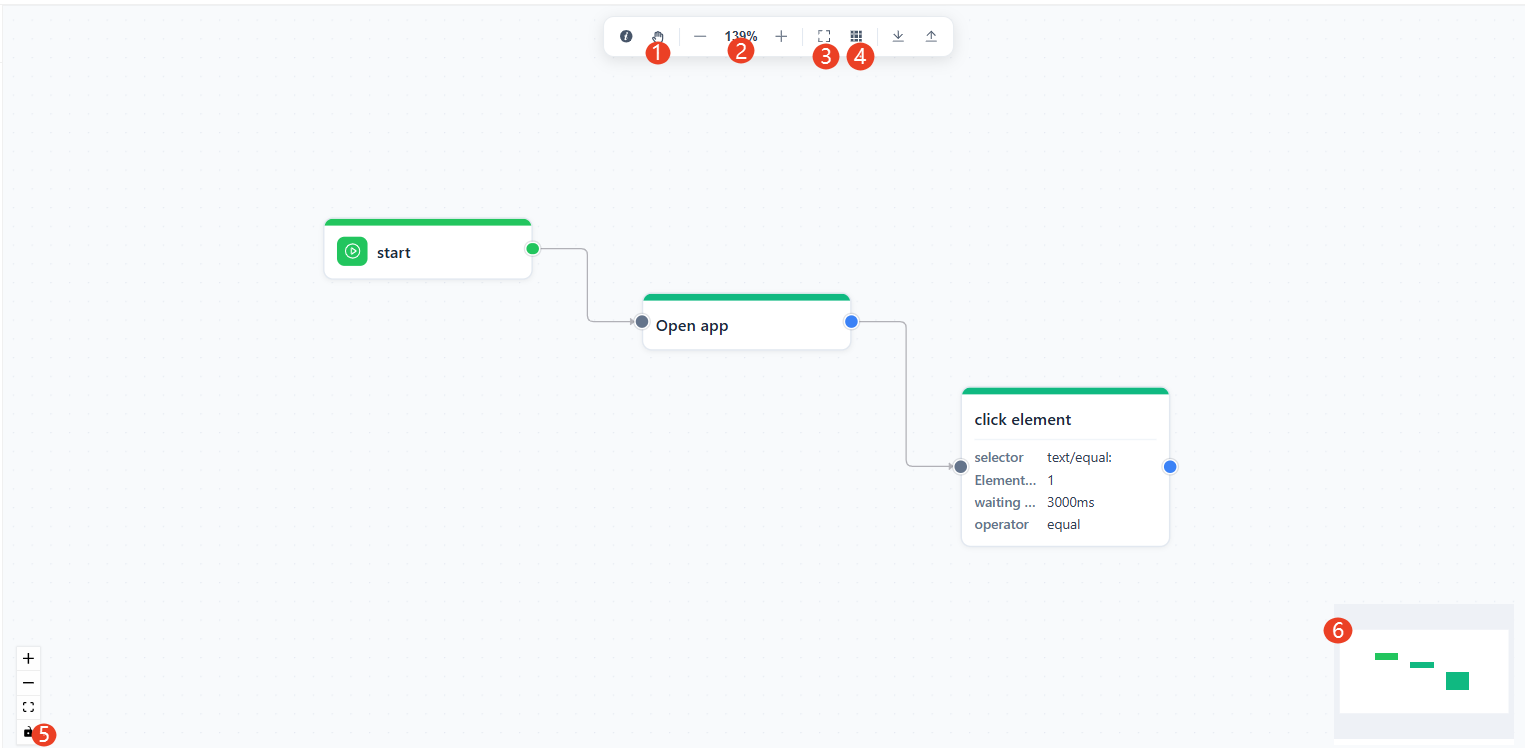
Use ➊ to drag and move all tabs in panning mode. Alternatively, switch to select mode if you only need to adjust a single tab.
Use ➋ to to zoom in and out of the canvas.
Use ➌ to center aligned all tabs.
If your workflow feels cluttered, use ➍auto layout to organize all tabs instantly in panning mode.
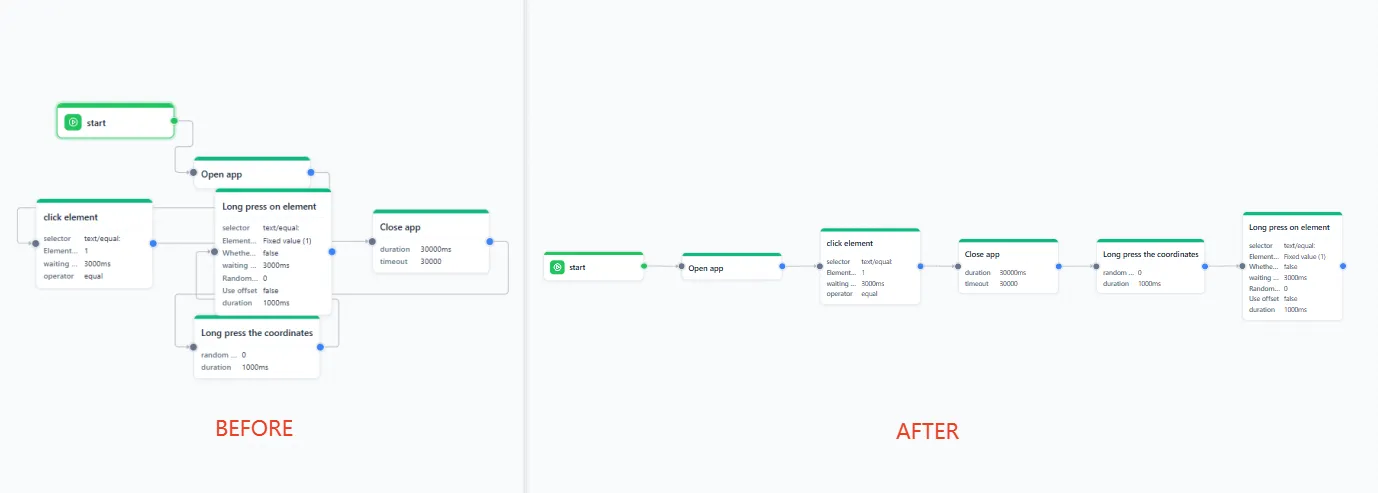
Use ➎ for disable editing, freeze the workflow and read-only mode.
The ➏ is minimap.
(c) Set goals before building RPA tasks. For example:
Goal: I need to use RPA to run multiple cloud phones for warming up my Instagram accounts.
Login multiple IG accounts
Scroll IG videos
Randomly Like
Post random comments on IG videos
(d) Outline roadmaps for goals, break down the goals into actionable tasks step-by-step. Think of how you interact with Instagram when using fingers, so you can follow this to build the task template in RPA workspace.
Roadmap: Track which page you visit, what button you click, and how many steps it takes to reach your goal. For example:
Open the Instagram app
Click 'Reels' button
Scroll down the videos
Click the 'Like' button
Click 'Comment' button, Typing and send comments
Add random conditions
End the task once 10 cycles are complete.
(e) Check off a few quick pre-steps to make sure everything runs smoothly in the upcoming lesson.
Device: set up at least one cloud phone.
Download Instagram to the cloud phone. Or click to see how to batch install apps on VMOSCloud.
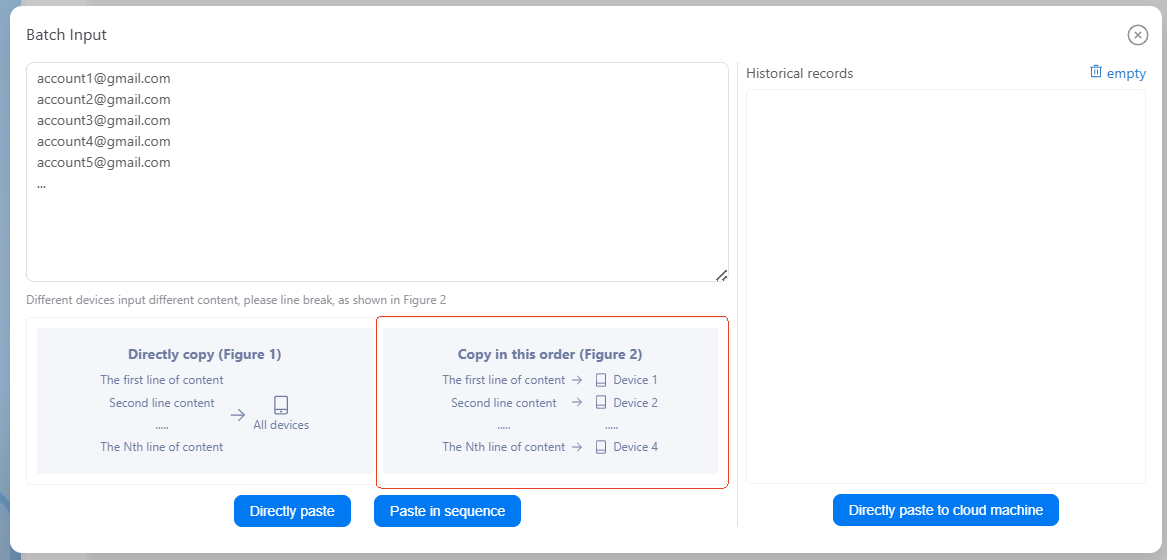
Log in account. Or use Synchronizer to batch login your profiles on Instagram: GO Home-> Group Control-> Batch Input-> Figure 2 -> Paste in sequence, so you can batch login the accounts in all the devices.
5. Step-by-step guide to build customized RPA workflow on VMOSCloud
After login successfully, let's build an automated taskflow as the roadmap above.
(1) How to preview tasks in-app?
Select one device to test, and use ->UI Inspector preview how your templates really work in cloud phones.
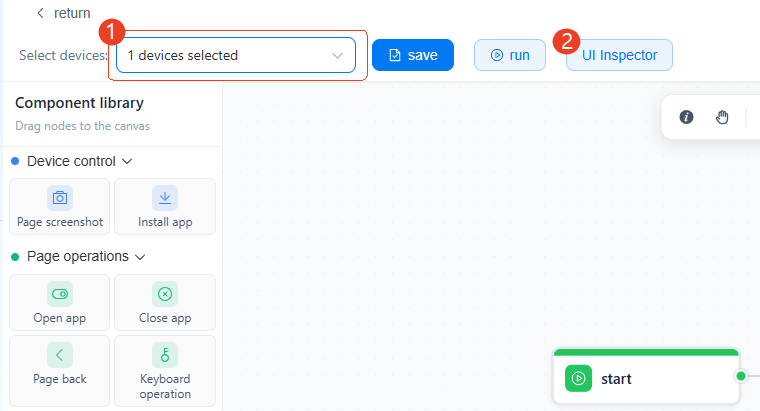
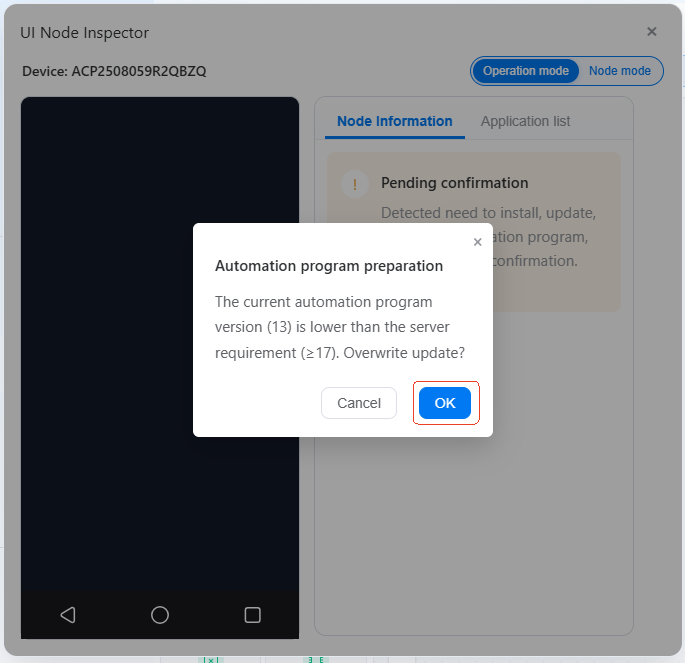
After clicking the UI Inspector, allow the system to install the automation update.
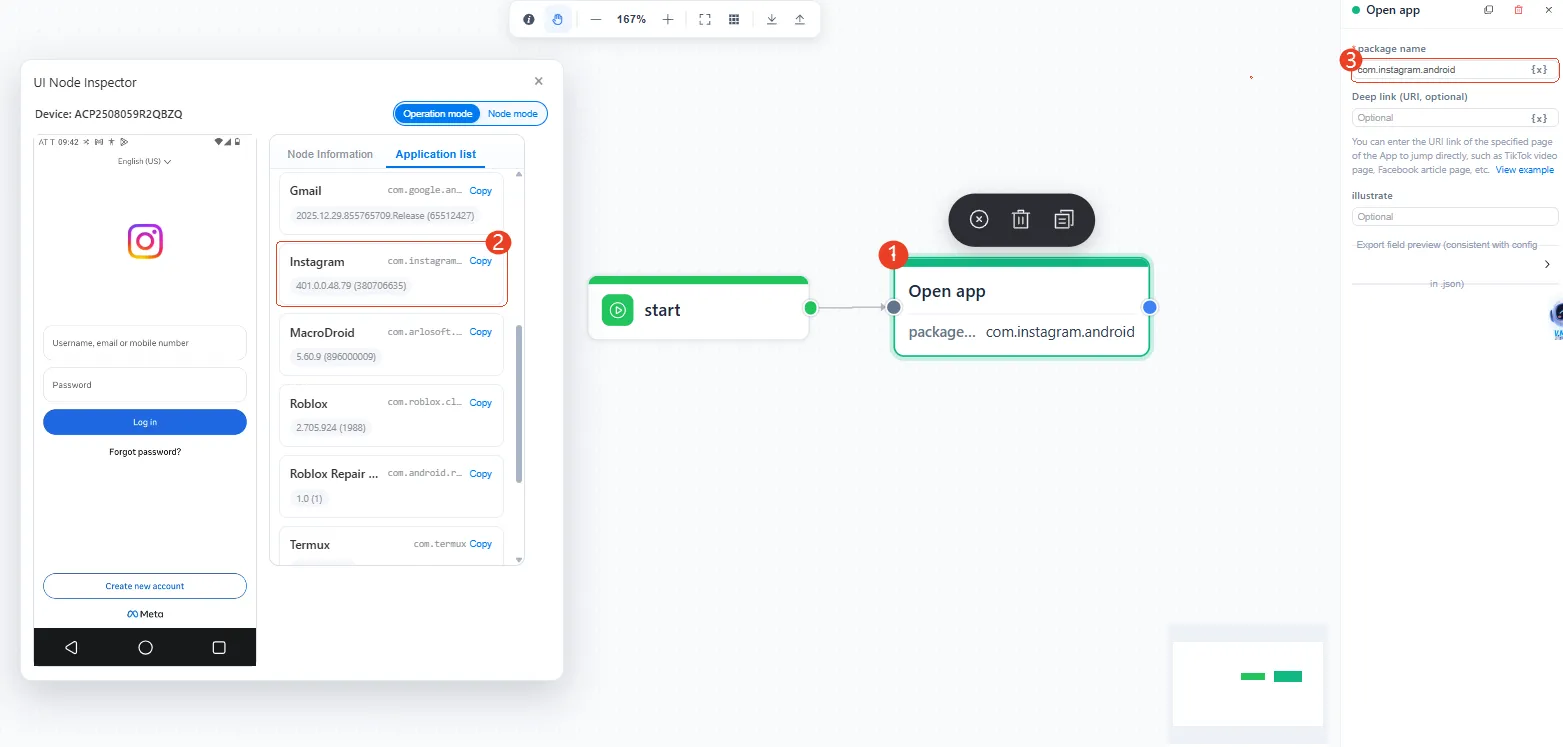
(2) How to set an open app task?

(How to set an open app task-video)
Drag to add an 'Open app' card -> click it and paste the Package name from the application list.
(3) How to set click action on RPA?
(How to set click action on RPA-video)
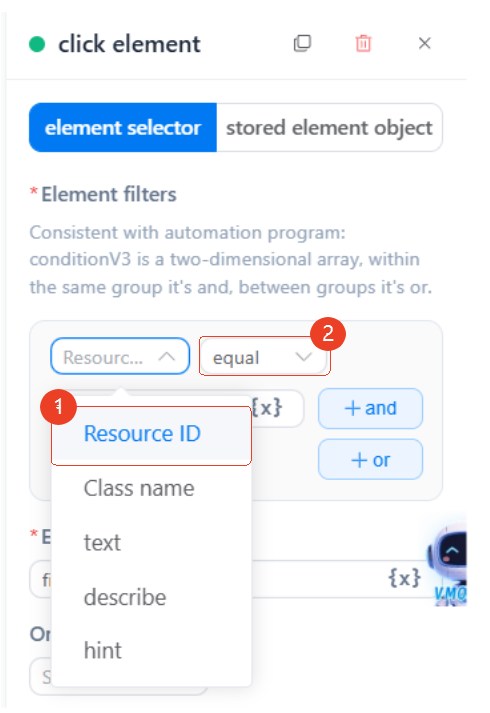
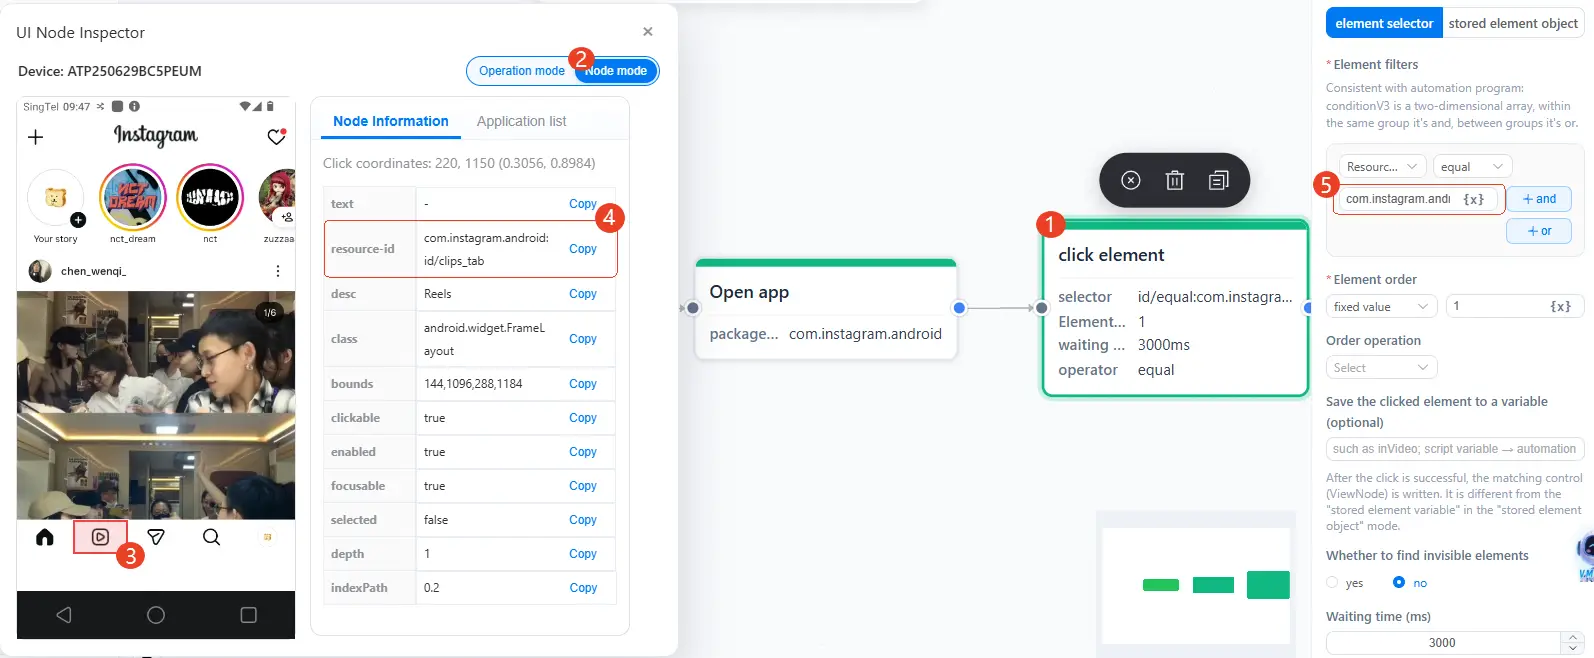
Add a 'Click Element' card and select Resource ID-> equal.
Toggle into Node Mode. From there, pinpointing the exact UI element you need takes just a single click. Then paste the Resource-id from the Node mode.
(4) How to set a random scroll action on RPA?
(How to set a random scroll action on RPA-video)
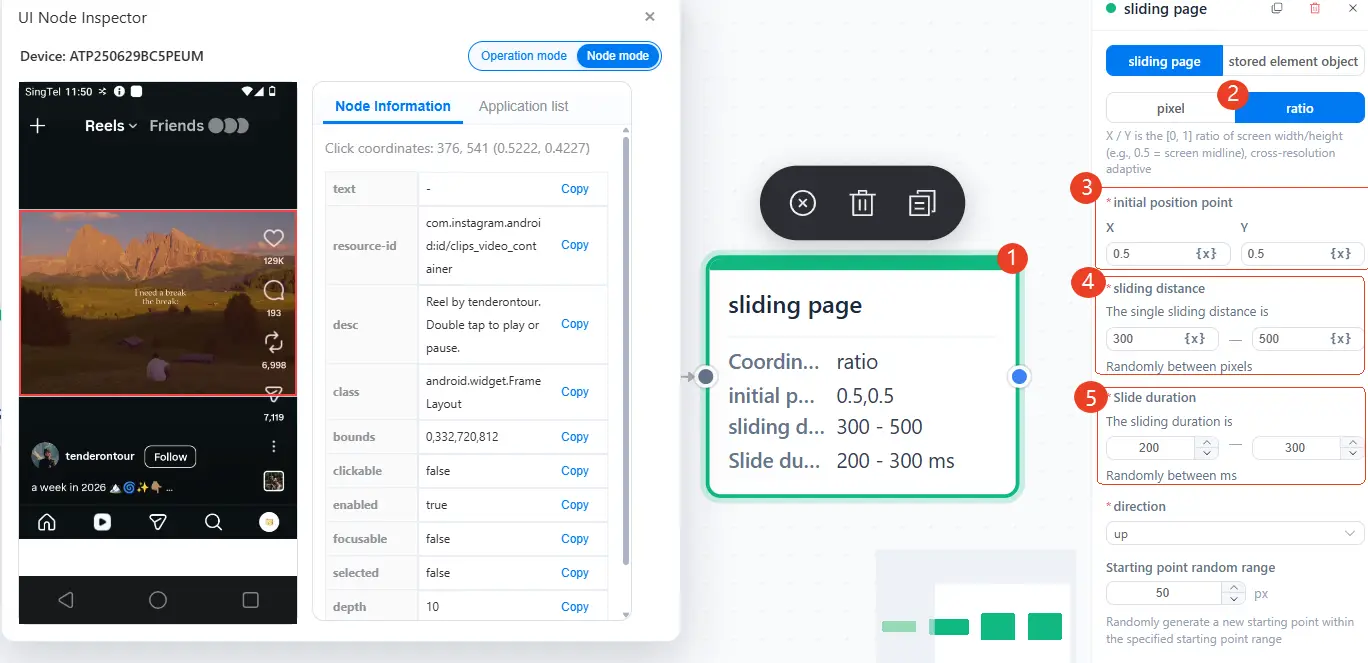
Add and set a 'Sliding Page' card as follows:
Select ->Ratio if you're a beginner.
The Initial position point defines the starting point for the scroll action, set X=0.5, Y=0.5. Sliding distance= 300-500. And paired with the Starting point random range= 50 px. This introduces a random offset to your starting coordinates to simulate human behavior.
Slide Duration specifies the randomized time taken to complete each scroll. We recommend keeping the default settings.
(5) How to set random Like & send comments actions on RPA?
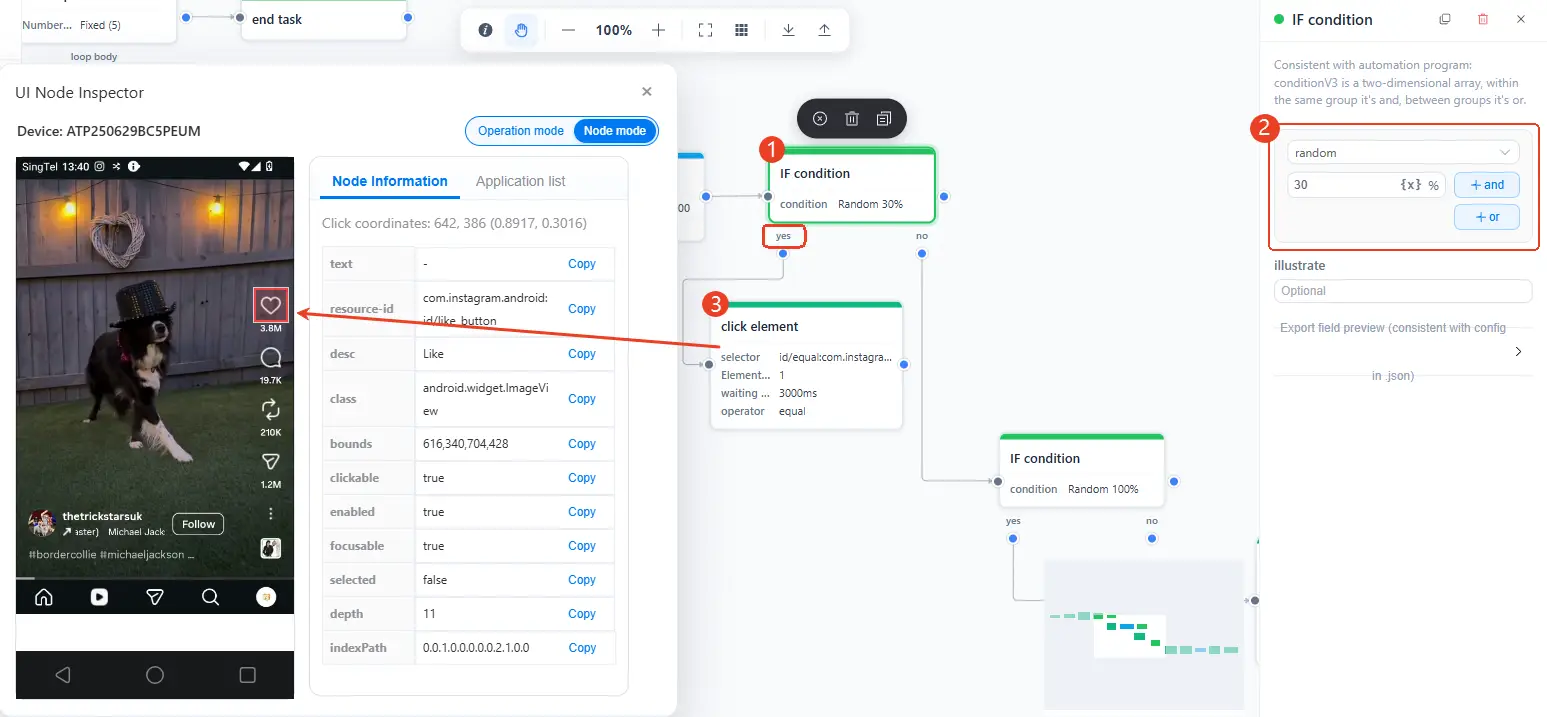
We need the bot to work like this, there is a 30% chance to Like videos, if not, there is a 60% chance to start sending comments in Instagram.
Use Process management-> 'IF Condition' card to set random like:
Configure a 30% random chance for video likes in it.
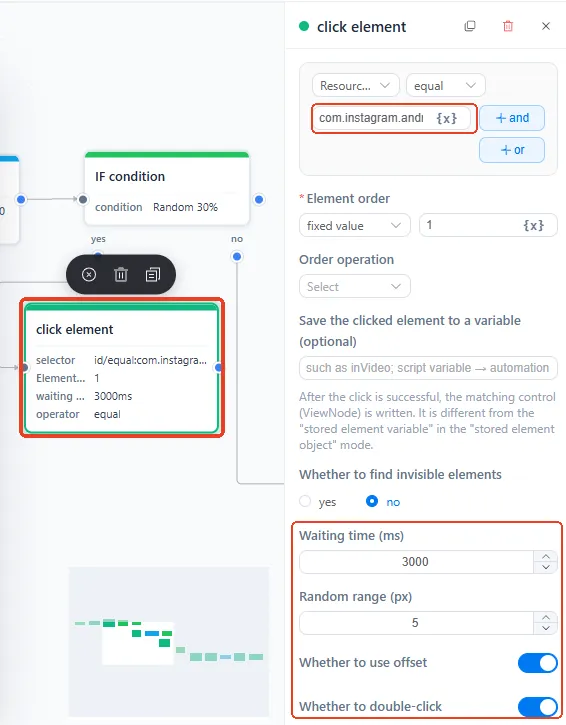
Add a new 'Click Element' card under the Yes branch as the below. Paste the Resource-id of Like buttons from cloud phone, Waiting time=3000ms (3s), Random range=5 px and allow offset to avoid bot detection.
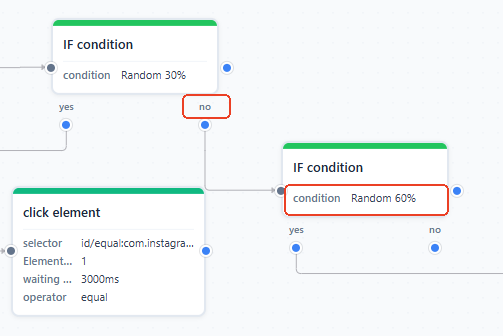
Afterwards, set comments send task: place an 'IF Condition' (60% random chance) to the No branch.
Next, create a comment-posting workflow under its Yes branch : Click comment -> Enter content-> Click send-> Close the comment section.
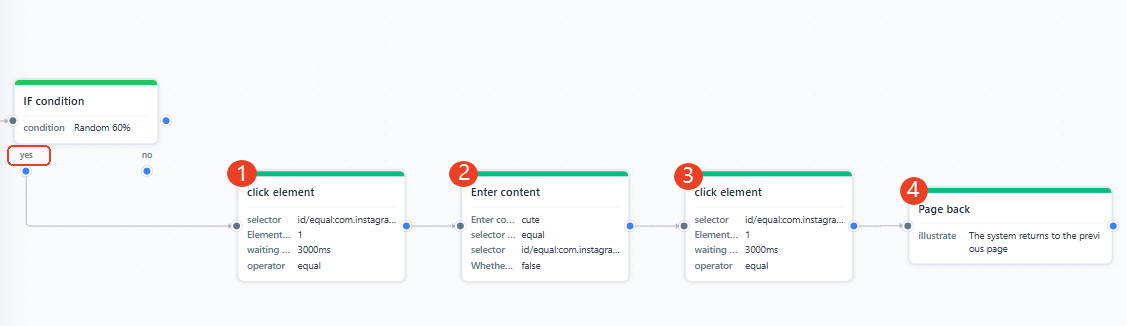
First, set ➊ 'Click Element' as follows:
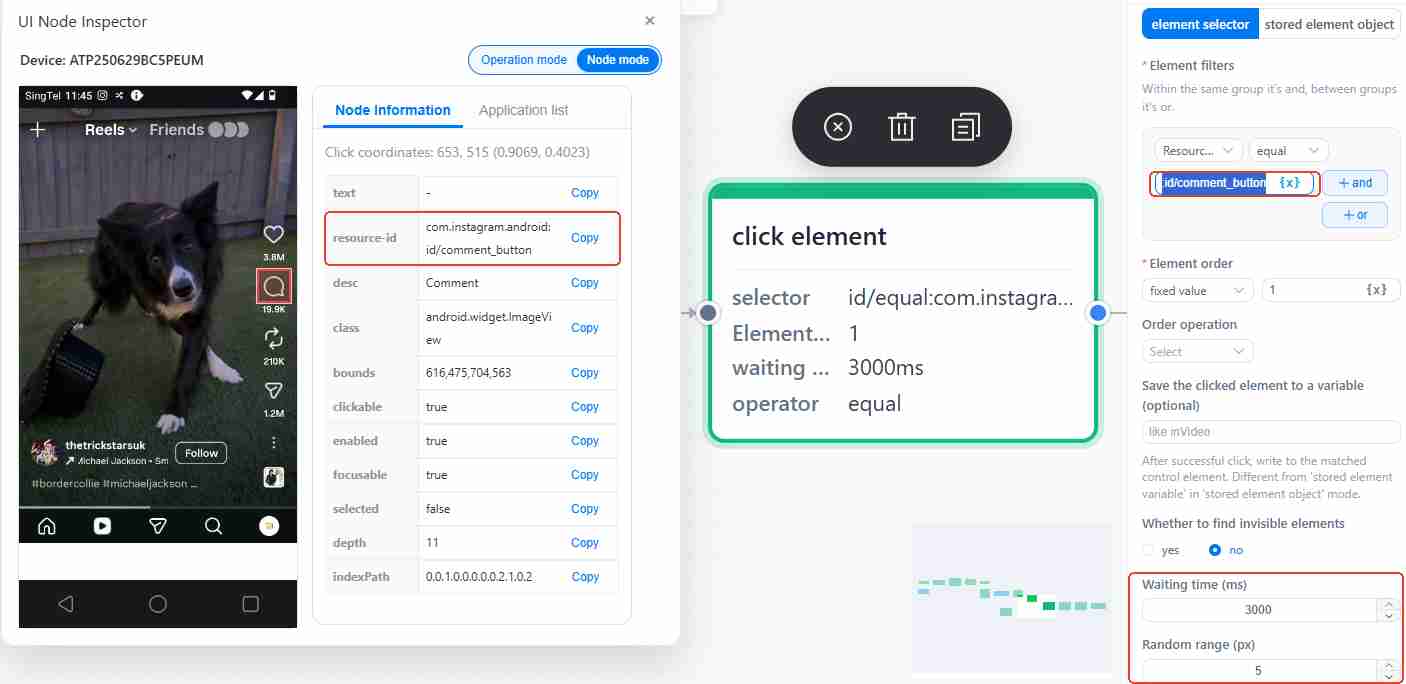
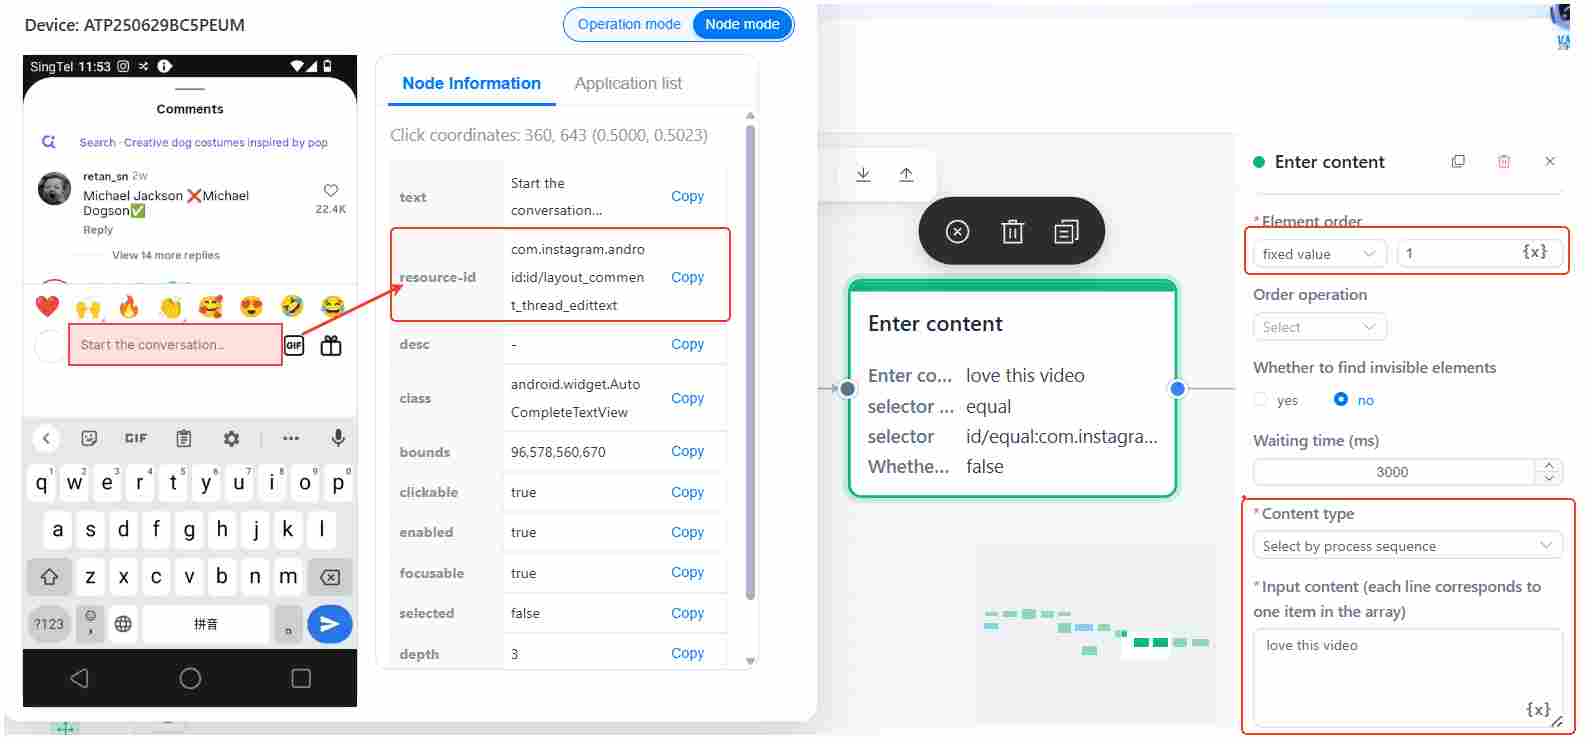
Next to add ➋ 'Enter content': Paste resource-id of comment section, Content type= select by process sequence, and set the Input content.
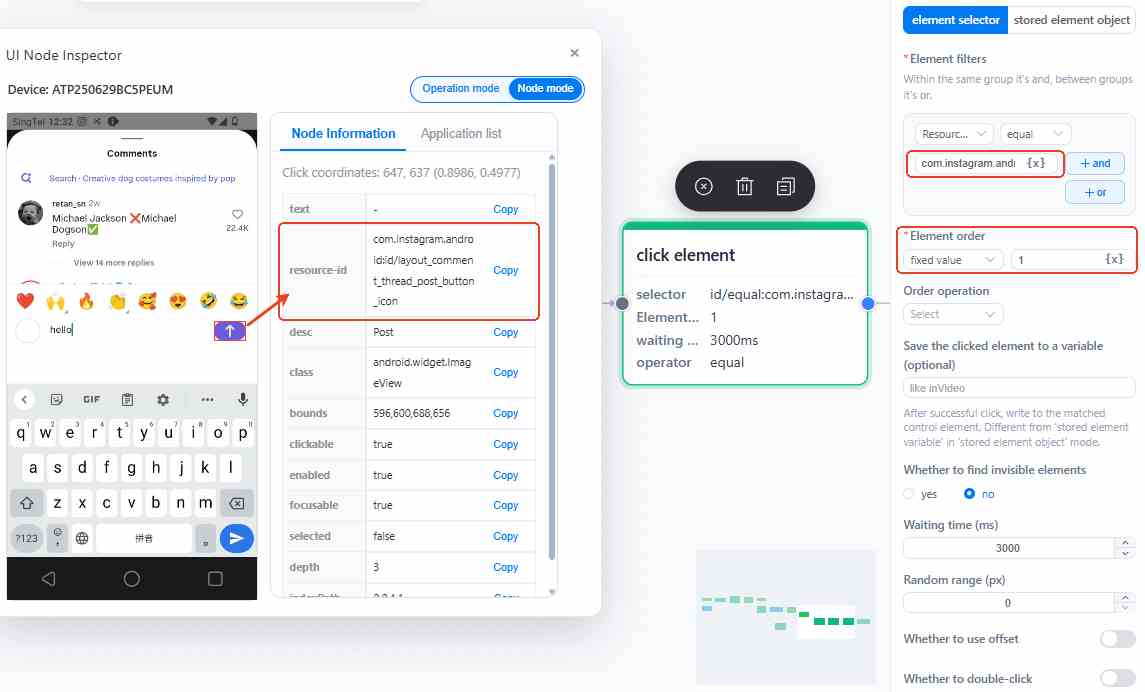
Set ➌ ‘Click Element’ for send button:
(6) How to return to video scrolling after posting a comment?
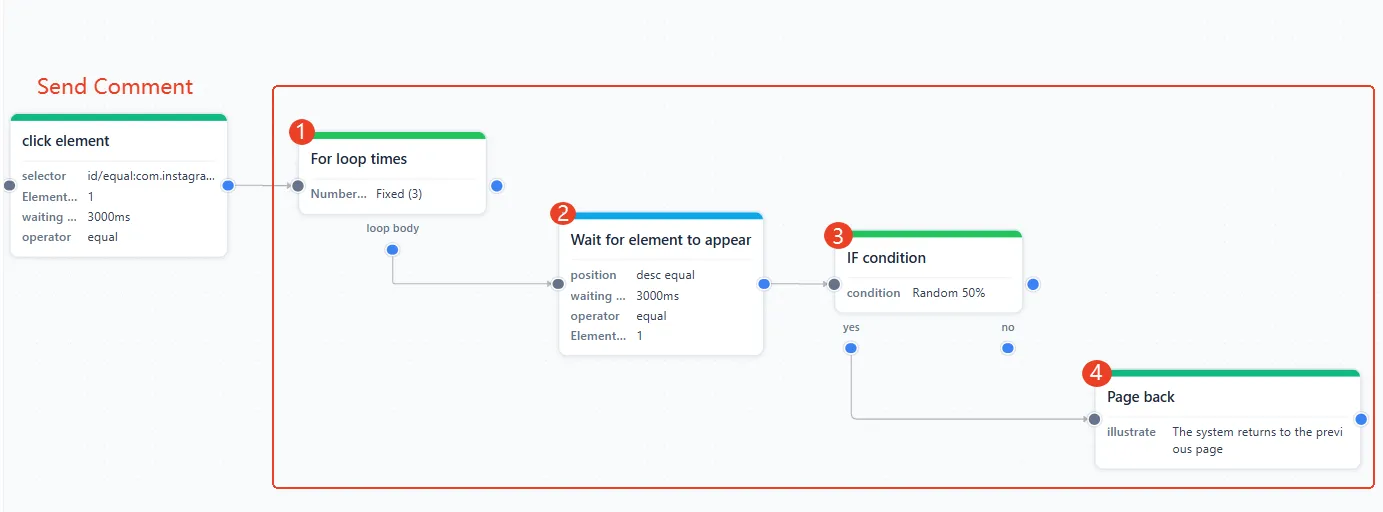
After a comment sent: the bot needs to navigate back until the comment section is fully dismissed.
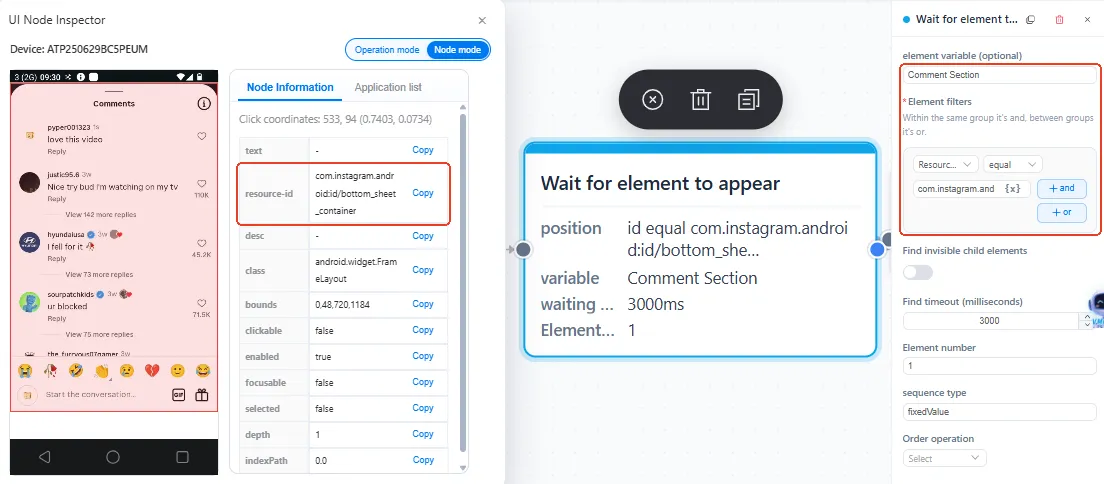
Add ➊ 'For loop times', set frequency= 3 times or above.
Find waiting operation-> add and set ➋ 'Wait for element to appear' and as follows, name Element variable=Comment Section.
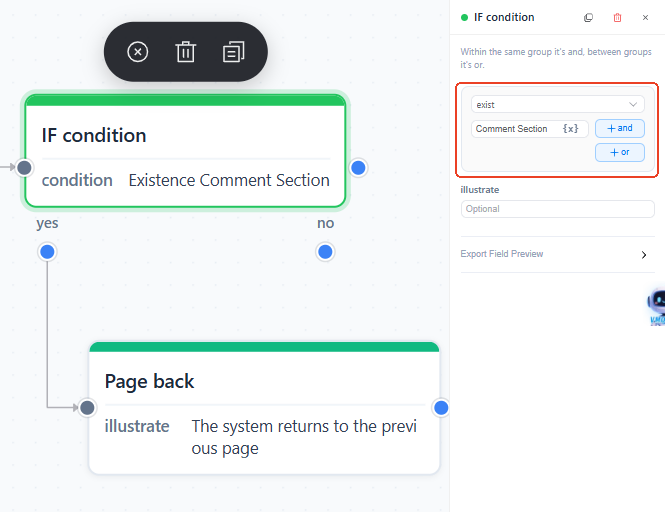
Finally, add ➌ 'IF Condition' to trigger ➍ 'Page Back' if the comment section is still visible. Set IF exist= Comment Section.
(7) How to keep a task circling until it ends?
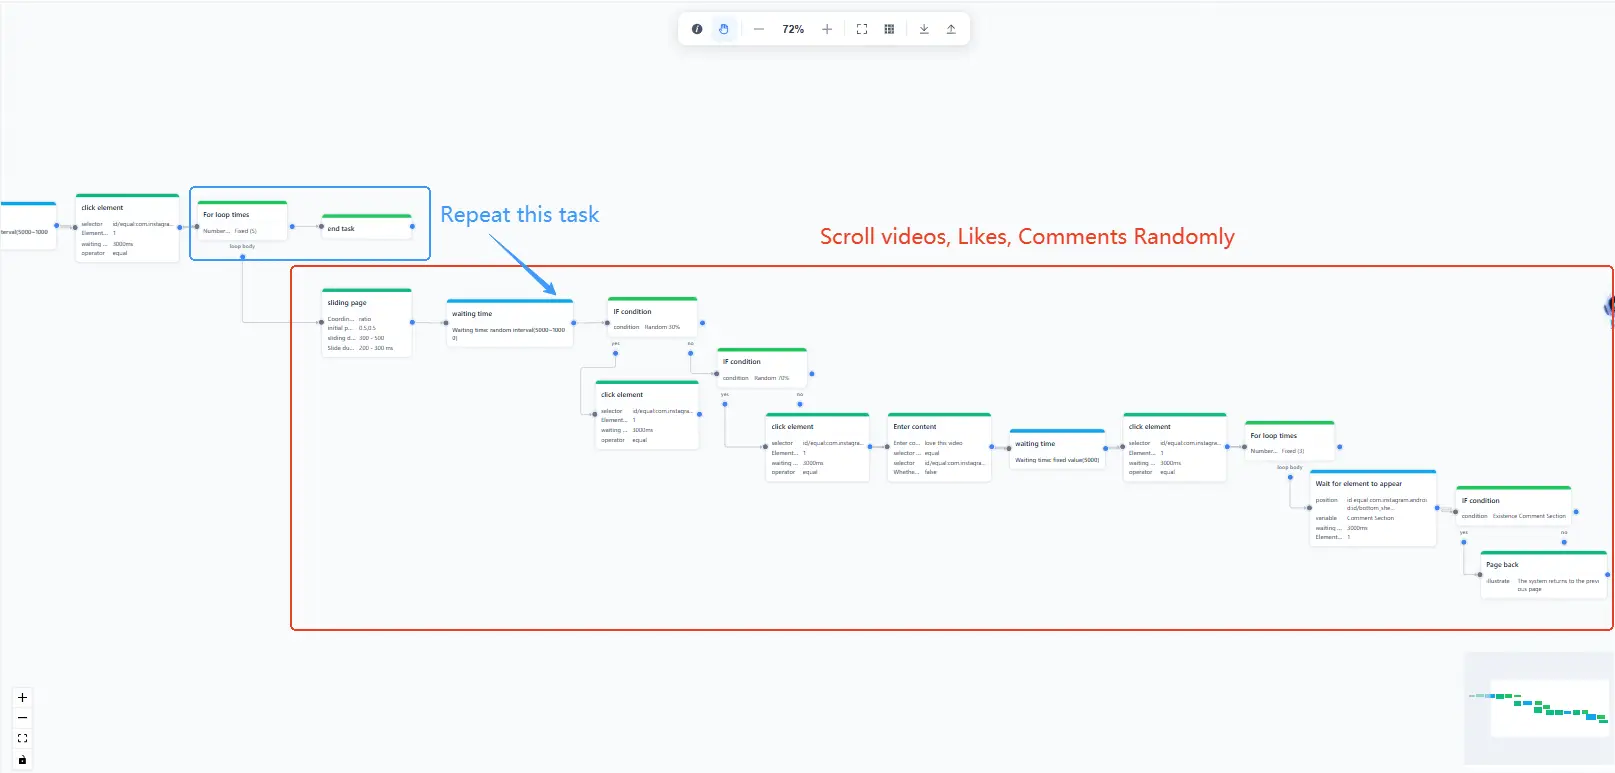
Well done! You've just completed the basic task configuration. This RPA template is ready to automate video views, likes, and comments. However, we still need to fine-tune a few details to ensure seamless execution.
The red box below shows a single run of the browse-like-comment sequence. To repeat this process 10 times until the workflow ends, we need to integrate a Loop card (the blue section) before it.
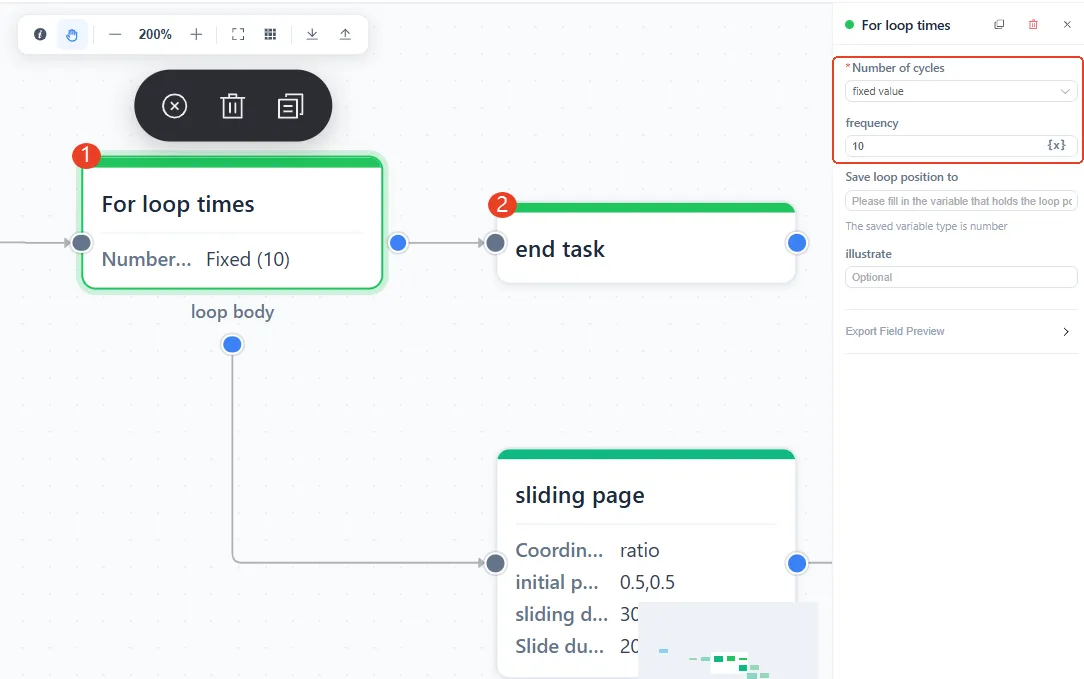
What You need do: Add a ➊'For loop times' from process management,set Number of cycles= 10 times, and add ➋'End task' card after it. That's all.
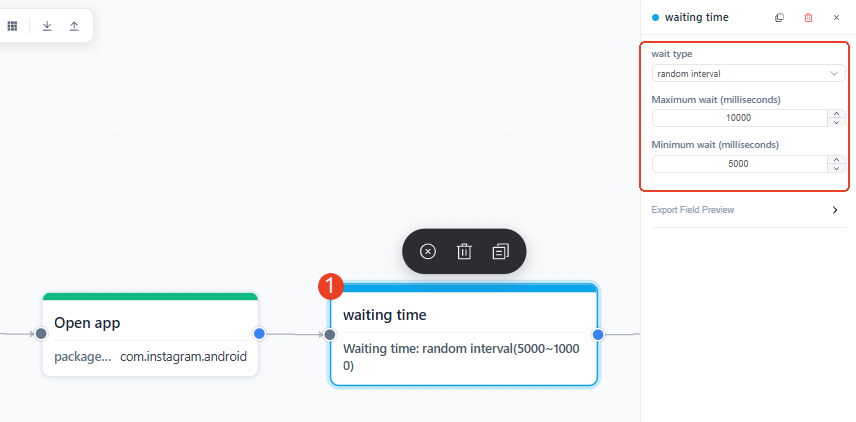
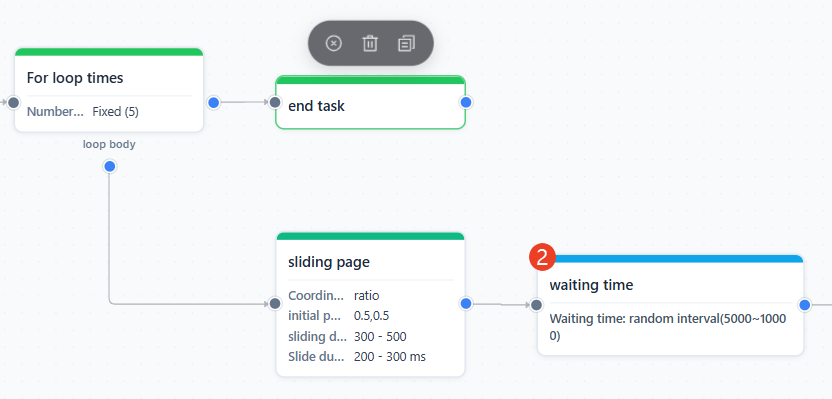
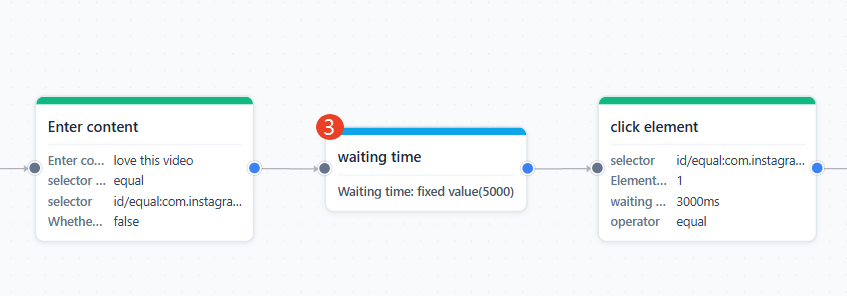
Insert 'Waiting Times' cards at appropriate intervals—especially after actions that require rendering or response time. For example, we can add some time cards in this task:
(1) after opening the app, set the delay times = 5s-10s.
(2) after the sliding page card, each should stay on the video for 5–10s before triggering the next scroll.
(3) after the enter content card, the bot should wait some time to click the send.
6. The End
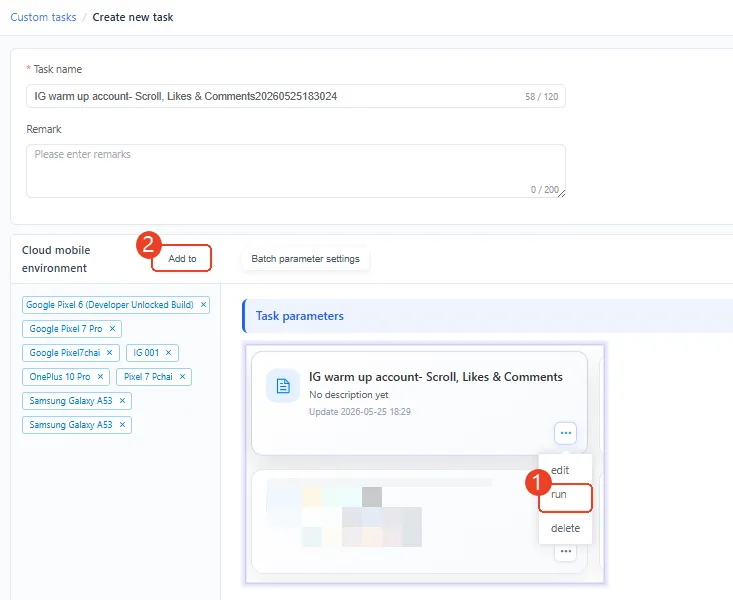
Congratulations you already successfully built a customized RPA workflow (aka. Bot template) for warming up Instagram accounts, remember to Save the template before exit.
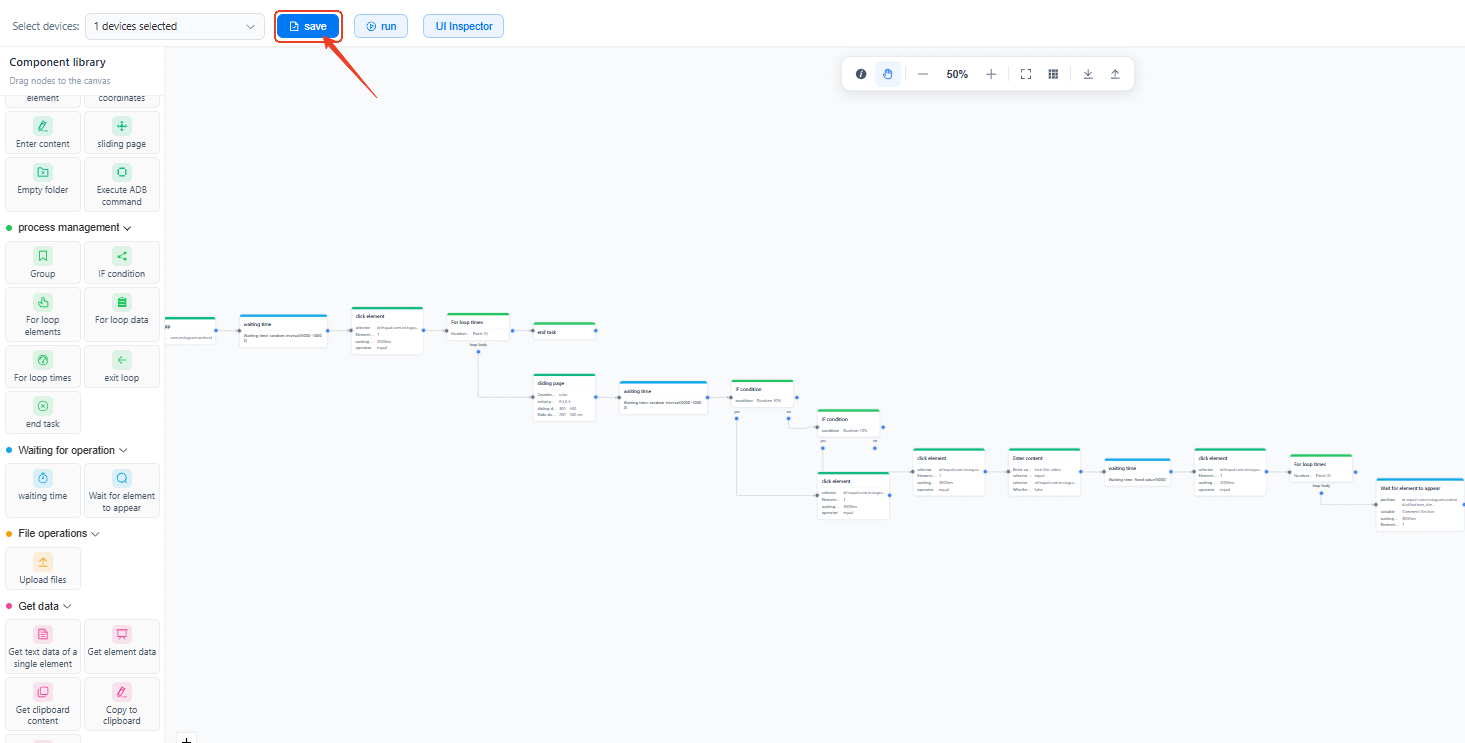
Then Click Run-> Add to, select the devices you need to run the task on multiple cloud phones.
Now that you know the basics of RPA, feel free to experiment on VMOS Cloud by tackling more advanced tasks. We'll be sharing more step-by-step tutorials soon—see you in the next guide!